Plint Subtitler: Online manual
End user documentation for the Plint online editing tool.
Tip: use the search field to find a topic. In order to search for a phrase, use quotes: e.g. "spell check".
- Plint Subtitler: video introduction
- Plint Subtitler: the interface
- Save vs. auto-save
- Plint Subtitler: menus
- Plint Subtitler: edit buttons and options
- Plint Subtitler: Flags
- Plint Subtitler: Select subtitles
- Plint Subtitler: subtitle list and job details
- Plint Subtitler: setting shortcuts
- Plint Subtitler: available shortcuts
- Plint Subtitler: spell check
- Plint Subtitler: error reporting
- Plint Subtitler: MQM mode
- Plint Subtitler: Troubleshooting / FAQ
- Guide: Time coding in Plint Subtitler
- Plint Subtitler: DubQC (Additional Audio Track)
Plint Subtitler: video introduction
Origination and time coding
An introduction to Plint Subtitler and the most common actions and commands used for subtitle origination.
00:00 - Intro
00:50 - Overview
01:17 - Shortcuts
02:43 - Navigation
03:57 - Scene change
04:19 - Split & Merge
05:00 - Set clip's time-out and fix/create next
07:22 - Clip time in & time out
07:56 - File & edit menus
09:19 - Clip menu
10:53 - Workspace menu
12:03 - Comments field
12:58 - Error field
14:04 - Editor field & timeline
17:03 - List view
20:21 - Job details
Subtitling from template
An introduction geared towards subtitling work based on a timed template.
00:00 - Intro
01:30 - Interface
01:53 - Limit editing
03:00 - Truncate translations
03:40 - Translation not needed
04:10 - Styleguide
04:57 - Start translating
06:55 - Keep translating
08:10 - Add FNs
10:01 - Translation Completed
10:37 - Before delivering
11:12 - Proofreading
12:22 - Add comments
13:20 - Add more comments
14:20 - More on comments
Plint Subtitler: the interface
Note: The following describes the most common window layout when using Plint Subtitler. There is also a "Basic mode" with some important differences. The main tools are the same in both layouts, however. Available options may also differ depending on job settings. The "Limit editing" mode will for example hide tools that are used to change the timing of clips.
Please note that you can change the size of most sections, to accomodate different screen sizes or preferred ways of working. Your settings will be stored for the next time you go to work.

Subtitle information tabs (1)
This area holds different tabs with information about the active/selected subtitle. For example:
-
The Comments tab (5)
- To add comments to the active subtitle, enter your text and press the arrow button. Please note that comments may be visible to other people working on the same file/translation throughout the project, such as proofreaders or clients doing review. You can navigate between subtitles with comments using the arrows.
-
The Errors tab
- Displays errors for the active/selected subtitle. You can navigate between subtitles with errors using the arrows.
- If the file contains multiple errors, you can navigate between them using the arrows.
-
The Script Annotation field (6)
- This field may hold additional information about the dialogue or information as a help to the translator. Depending on job settings, it may be invisible, visible or editable.
The monitor (2)
Here is where the video is shown, along with a live preview of subtitles (optional). The preview will also show basic formatting such as italics and position.
Tip: Under the monitor options (the "cog" icon), you can specify what to show here, such as timecode, controls, safe area and even the subtitles themselves. Under "Settings" you can specify the size of the timecode and text in the monitor. Your settings will be stored and reused the next time you go to work.

The Subtitle list and Job details area (3)
The list displays the subtitles in chronological order. Selecting "Job details" gives you information about the job such as name of project, target language, comment/information from the project manager etc. More information here.
Here, you also find a couple of important buttons:
-
Home - Takes you back to your Dashboard without changing the status of the job.
- This means that it will still be accessible for further work by you.
-
Job info - Exits the editor and takes you back to the job information page.
- This page presents more information than the "Job details" tab, such as price information, information about the project manager, etc. To access the editor again from the Job info page, select "Go to work" in the upper right corner.
-
Change status - Sets the job to "Done" when you have completed the translation. Here you can chose to add a general comment to the job, and/or comments to the project manager.
- Once you have changed status, the job will be removed from your Dashboard and you cannot access it again.
- Depending on job settings, changing status may also include steps for confirming that you have run the Spell checker or Report tool.
Please note that these buttons will differ if you are accessing the editor through a Quicklink.
The subtitle editing area (4)
The black subtitle editor field is where you write your text. The text is simultaneously seen in the video window. If you want to edit the text, place the cursor in the subtitle editor field. More information about buttons and options here.
If there is reference text from a subtitle template, it will be displayed next to the editor field against a grey background.
Timeline (5)
The timeline shows all subtitle clips. Scene changes are highlighted with red markers. Depending job settings, an audio waveform may be displayed on the timeline as well.
Save vs. auto-save
You should save your work at regular intervals by pressing CTRL + s (default shortcut) or choosing File / Save. Pay attention to the save status in the menu bar. An asterisk by the job name means the the latest changes are not saved. As an additional help, Plint will automatically save your work every five minutes.
Asterisk highlighting unsaved changes
-NuTxT-Web.png)
If you take a break, and before changing status, it is especially vital that you save your file on the server. Plint will remind you to do this if you try to leave the editor without saving. As an additional precaution, the file will always be automatically saved when you click "Change status".
Auto-saved backups:
Plint Subtitler will also regularly store a local backup copy of your work. This version will only be available from the same computer, browser and job and will be automatically loaded under certain circumstances.
Should, for example, your browser or computer crash in mid-work or if you lose your internet connection, the latest changes are probably not going to be saved on the server. When you open the same job again, on the same computer and browser, Plint will check if your local backup is more recent than the version stored on the server. If it is, the backup will be automatically loaded, so you can continue working where you left off.
Additionally, there are intermittent backups saved for each job, as a complement to the Milestones created on each status change. If the job settings and your login type allows, these backups can be found under Review / Track changes.
Plint Subtitler: menus
Most of the common functions in Plint Subtitler are accessible through the top menus. The following list summarises and clarifies their functions.
Please note that depending on job settings, some options may not be visible.
The File menu


- Save - saves the file on the server
- Properties
- General - Various settings, such as the number of History states.
- Import - allows you to import a subtitle file to edit.
- Export - allows you to export the current work in a format supported internally by Plint
- Please note that job settings may limit the formats available here.
The Edit menu
- Undo - Undoes the last action.
- Redo - Reverts the last Undo.
- Go to - Displays the Go to subtitle number dialogue, where you can chose which subtitle block you want to go to.
- You can also specify a certain time to navigate to.
- Find/Replace - find recurring instances of words or strings and batch replace them
- this function finds instances of the search string in subtitle text, reference text and comments
- however: replace can only be applied to the subtitle text
The Clip menu
- Add - Adds clip at the beginning or at the current time.
- Split - Splits the subtitle into two separate clips.
- (Preceeded by a dialogue controlling splitting behaviour)
- Set - Set in time to current time and Set out time to current time.
- Merge clip - Merges the clip with the next subtitle.
- It is also possible to merge with the previous subtitle - please check the shortcut settings.
- Renumber all clips - Ensures that the clips are renumbered from 1.
- Remove - Removes the current subtitle.
- Swap/copy track - move or copy all text from one type of field to another.
- For example, copy the entire reference text into the editable subtitle fields.
The Review menu
- Spell check
- Performs a spell check on the entire file and suggests alternative words where possible errors are found.
- Supported languages are continually added.
- Report tool
- Check the entire file for errors / inconsistences based on job/project settings.
- Typically, timing errors, exceeded character counts and such.
- Report profiles are handled centrally and can not not be adjusted from within the editor.
- More on error reporting here.
- Track Changes
- Here is where you can compare different versions/edits of the translation (please note that this feature requires activation on job level and thus may not always be available).
- A backup or milestone will be shown together with date/time information and what type of Job it was linked to. Together, they provide context for the version so you know what you are comparing to.
- More on versions and milestones here.
The Workspace menu
- Lock tools - Locks the workspace. To move panels around, uncheck this box.
- Auto Focus clip - As you play the video, the text in the subtitle editor field will change as the marker moves along the time line
- Audio scrub - As you jump frames, no matter how many, you will hear part of the audio
- Switch to basic mode - Shows a different editor layout
- This layout, among other things, shows the file used for the reference text on a separate timeline.
- This can be useful for comparing changes to the template after translation work has begun.
The Settings menu
- Shortcuts - Edit the shortcut settings.
The Help menu
- Redirects you to the help section.
Plint Subtitler: edit buttons and options
Edit buttons

- Set italics for the section you have marked. Can be several words, parts of a sentence etc.
- Set bold for the section you have marked. Can be several words, parts of a sentence etc.
- Set underline for the section you have marked. Can be several words, parts of a sentence etc.
- Set super script for the section you have marked. Can be several words, parts of a sentence etc.
- Set sub script for the section you have marked. Can be several words, parts of a sentence etc.
- Set color for the section you have marked. Can be several words, parts of a sentence etc.
- Set italics for the line in which you have placed the cursor.
- Set italics for the word in which you have placed the cursor.
- Add a music note to the subtitle block. This is used to mark singing or songs, when required.
- 9-point positioning. Positioning the subtitle in screen.
- Sets the reading order from right to left. Applicable for certain languages such as Hebrew.
- Show formatting as HTML code. Displays formatting tags added to the Subtitle. You are able to add and edit these tags.
- Text alignment left, center or right.
- Set italics for the whole subtitle.
- Raise the subtitle to the upper part of the screen.
- Set capital letters for the whole subtitle.
- Flag event. Adds a flag to describe the type of subtitle
Options

- Separation 1 - Number of seconds and frames between the beginning of the selected subtitle, and the end of the previous subtitle block. In this example the previous subtitle ends 10 seconds and 2 frames before the selected subtitle starts.
- Index - The subtitle block's number. The subtitles are in chronological order. NB! If you are doing template creation, you need to renumber all subtitles before marking the job as Done. Go to the Clips menu, and "Renumber all clips", which ensures that all subtitles are numbered from 1.
- Time-in - At what hour, minute, second and frame the subtitle starts. In this example the subtitle starts at 37 seconds and 11 frames from the beginning of the video.
- Duration - How long the subtitle is seen on screen. In this example for 3 seconds and 4 frames.
- Time-out - At what hour, minute, second and frame the subtitle ends. In this example the subtitle ends at 40 seconds and 15 frames from the beginning of the video.
- Count - Displays the character count for each line.
- Reading speed - Displays the reading speed (characters per second).
- Separation 2 - Number of seconds and frames between the end of the selected subtitle, and the beginning of the next subtitle block. In this example the selected subtitle ends 11 frames before the next subtitle starts.
Shot changes

Shot changes are indicated by red lines on the timeline . Please note that some shot changes may be "false" and do not indicate a shot change (it could sometimes be someone walking by close to the camera, which the editor perceives as a shot change).
Plint Subtitler: Flags
Plint Subtitler: Flags
In Subtitler, flags can be used to mark subtitles. You can mark subtitles with one or multiple flags.
Add a Flag to a Subtitle:
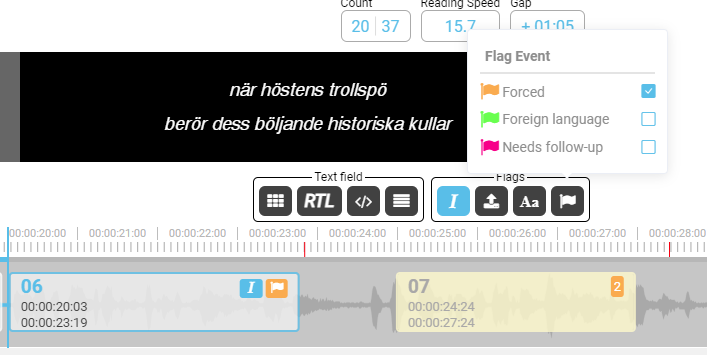
To add a flag to a subtitle, first focus on the subtitle. You will find the flags among the buttons below the text field. Click on the flag icon, and a menu will appear where you can select the flags you want to add to the subtitle. Multiple flags can be chosen for each subtitle. Once selected, the flag will appear as a symbol on the subtitle in both the Timeline and List views.
Add Flags to Multiple Subtitles:
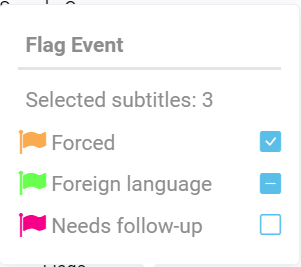
You can apply flags to multiple subtitles at once. First, select the subtitles you want to affect. (You can read how to select subtitles here). When working with multiple subtitles, there are different checkbox statuses to note:
- If the checkbox has a checkmark, all selected subtitles currently have this flag.
- If the checkbox has a dash, one or more of the selected subtitles lack this flag. Clicking the checkbox when the dash is visible will add the flag to the subtitles that lack it.
Filter:
You can filter subtitles by flags. The filter can be found under the List view. In the filter, you can choose one, several, or no flags. Only the filtered subtitles will be visible in the list. In the Timeline, all subtitles are visible, but those outside the filter will be grayed out. Using the shortcut "Jump Subtitles" will navigate between the filtered subtitles only.

Default Flag:
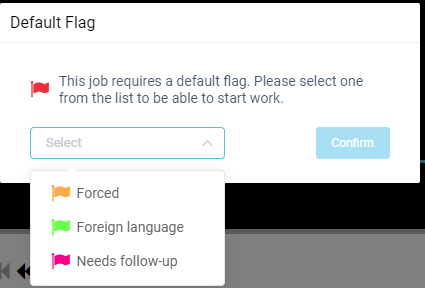
For certain tasks, a specific flag is required. In such cases, you will be prompted to select a flag when starting the task. When you create a subtitle, the selected flag will be automatically added to each new subtitle. This selection is saved at the job level, so the next time you or another user accesses the same job, this flag will still be the default. To change the default flag, go to Properties (File >> Properties >> General) for the job. Only new subtitles will receive the new flag; previously created subtitles will retain their original flags.
Import:
When importing subtitles, you can choose to import subtitles with a selected flag or flags. If a default flag is set for the job, it will be pre-selected during import.

Report Tool Rule:
If the rules are set to report on flags, they will appear when running the report tool. The rule checks for either flagged subtitles or subtitles without flags.

Restriction on Status Change:
Depending on the rule settings, you may be prevented from changing the status if the rule is not met. If this happens, you will be prompted to filter the list to resolve these issues. Once resolved, you will be able to change the job's status.

Plint Subtitler: Select subtitles
Select Subtitles
To edit multiple subtitles simultaneously, you can start by selecting the subtitles in the Timeline. There are several ways to select subtitles, which we will go through below.
Select Using CTRL (CMD on Mac) and/or SHIFT Keys:
- CTRL (CMD on Mac): To select or deselect individual subtitles, use CTRL in combination with a left mouse click. Hold down CTRL and left-click on the subtitles you want to select. To deselect a subtitle, repeat the same action on a previously selected subtitle.
- SHIFT: To select a segment of subtitles on the timeline, use the SHIFT key along with the left mouse button. Hold down SHIFT and click on the first subtitle in the segment you want to create. Then, go to the last subtitle and do the same. This will select the subtitles you clicked on, as well as those in between.

Right-Click on Timeline:
If you right-click on the timeline where there are no subtitles, you can access the Select menu. Here are the options available:
- Select all: Selects all subtitles on the Timeline.
- Select from start to hh:mm:ss:ff: Selects subtitles from the start to the position of the playhead on the Timeline.
- Select from hh:mm:ss:ff to end: Selects subtitles from the playhead position to the end of the Timeline.
- Invert selection: Inverts the current selection, so all unselected subtitles become selected and vice versa. This option only works if at least one subtitle is selected.
- Deselect all: Deselects all subtitles on the Timeline.

Select Range Tool:
The Select Range Tool allows you to choose subtitles within a specific range. You can access this tool from the Subtitle drop-down menu. There are two different selection modes:
- Time Range: With this mode, you define a start time and an end time. All subtitles that fall within this time range will be selected.

- Index range: In this mode, you select a range of subtitles based on their index numbers. We have introduced new functionality that allows you to add multiple index ranges.
- To add a new range, simply create a new row.
- You can add a row by clicking the plus button (+) next to the existing range.
- Alternatively, you can use the keyboard shortcut Shift + Enter to quickly add a new range.


This enhancement makes it easier to select multiple sets of subtitles in a structured way.
Plint Subtitler: subtitle list and job details
The list area displays the subtitles in chronological order. Selecting the settings icon, will give you these options.

Show reference text: If you want to see the reference text or not (typically an English-language template).
NB! This only applies if you are translating against a template, not if you are doing template creation.

Show subtitle modifiers: Shows if the subtitle contains any modifiers, such as italics, capital letters, raised text etc.

Follow active clip: Means that the active clip is shown in the middle of the list view, and as you play the video, the text blocks in the list view, as well as in the subtitle editor field, will change as the marker moves along the time line.
NB! This function is active only if you have checked the box "Auto Focus Clip" in the Workspace menu.
Job details tab
Clicking on Job details will provide more information about the current job.

Plint Subtitler: setting shortcuts
(Go here for a list of available shortcuts with explanations)
Go to the Settings menu and click on Shortcuts:

To get more options for a shortcut, click on the item. To choose what key to use, simply mark the Keys field and press the key or combination of keys you want to use as your shortcut.

Please note that while many shortcuts can be configured to what you are used to, there are still some shortcuts that cannot be selected. This is because your browser has priority with these shortcuts.

Plint Subtitler: available shortcuts
Numerous actions and tools can be accessed as shortcuts in Plint Subtitler. This list is continuously updated:
About "Disable in text editor"
Several shortcuts have the option "Disable in text editor". Checking this will prevent the shortcut from being executed if you press the key combo when you are working in a text field.
Augmented translation: Suggestion
Adds text from the augmented panel into the text field.
Source: Choose the source from which the suggestion to be added to the text field should come from when using the shortcut
- Translation Memory: N/A
- Term Base: N/A
- Machine Translation: Inserts the entire machine-generated translation suggestion from the Machine Translation (MT) section. Please be cautious, as using this function will overwrite the current text in the field.
Monitor: Toggle full screen
Maximizes the monitor to toggle a fullscreen view of the video with overlaid subtitles.
Navigation: Go to
With this shortcut you can jump through subtitles in a selected scope.
Destination: The destinations to choose between are:
- First: The first subtitle in the scope.
- Last: The last subtitle in the scope.
- Current: The current selected subtitle.
- Previous: The previous subtitle in the scope.
- Next: The next subtitle in the scope.
Scope: With this option you decide between which types of subtitles you should jump through. You can choose between:
- All: Jumps through all subtitles.
- First and last: Jump between first and last on the timeline.
- Comments
-
Any comments: Includes all subtitle segments that contain a comment.
-
New comments: Includes newly added comments for this job. These can either be comments created in the current job or new comments created in another job.
-
- Flags
-
All flags: Includes all subtitle segments with any flag.
-
Specific flag: Includes only subtitle segments with a selected flag.
-
- Italics
-
Any italics: Includes subtitle segments with any form of italic formatting.
-
Flagged full italics: Includes only subtitle segments flagged as fully italicized.
-
Partial italics: Includes subtitle segments where only part of the text is italicized.
-
Navigation: Jump frames
Jump through the timeline with frame precision. A positive value jumps forward on the timeline, and a negative one jumps backwards.
Audio scrub: Plays audio sample from content while jumping on timeline.
Navigation: Jump seconds
Jump forward or backward on the timeline with seconds as unit. A positive value jumps forward on the timeline, and a negative one jumps backwards.
Navigation: Jump to subtitle
Jumps between adjacent subtitles in the selected scope.
Direction: Determine the direction (Current, Next or Previous).
Scope: Select which type of subtitles to jump through.
Jump to: Determines if you want the playhead to jump to the in- or out-time of the subtitle.
Move playhead: Determines if the playhead should move along when jumping through the subtitles.
By time if play: With this option selected, you can set an offset value where the playhead should start playing after jump.
Pre-roll: Determines how many second before the subtitle the playhead should jump, before the content starts playing again.
Navigation: Jump to scene change
On the timeline you will often see red markers. These red lines display scene changes. With this shortcut, you can jump between these scene changes.
Direction: Determines in which direction the shortcut should work (Next or Previous).
Pre-roll: If the content is playing, you can determine how many seconds before the shot change the playhead should jump.
Navigation: Play/Pause
Plays and pauses the video in the monitor.
Resume mode: Determines from where the video begins playing.
- Subtitle in-time: The video will start playing from the beginning of the current selected subtitle subtitle.
- Time position: The video will start play from the playhead's current position on the timeline.
Pre-roll: This option only works with the Time position option on. Depending on the value you have entered the playhead will jump the amount in seconds back when pausing, and will continue from that position when playing again.
Project: Undo
Undo the latest changes you have made.
This affect changes made both for the text editor and changes you have made to the subtitle(s). How many steps you can go back depends on the value for the History States in the Properties panel. Default value is 20.
Project: Redo
Redo the changes you previously have undone.
Project: Save
Saves the latest changes manually. You know the job is saved if there is no asterisk shown to the right of the work title in the main menu. When you press the key combo for Project: Save, you will also get a feedback with an alert to the upper right of the workspace.
Subtitle: Add flag
This feature allows you toggle chosen flag for active subtitle. You can also configure it to toggle the chosen flag for all selected subtitles.
Choose flag: Choose the flag you want the shortcut to toggle between.
Add flag to all selected subtitles: This option enables the functionality to toggle the selected flag for all selected subtitles.
Subtitle: Add new subtitle
Adds a subtitle where the playhead is placed on the timeline.
With Auto focus editor you can choose which text edit field you prefer to edit when you have added a new subtitle. You might want want to add subtitle text right away, or perhaps add a comment.
Subtitle: Merge subtitle with next
Merge the selected subtitle with the next subtitle on timeline.
Merge text: Activate this setting if you want the text content to be merged as well. If this option is not selected, the selected subtitle's text content will be the text that remains, and the other subtitle's text will be deleted.
Merge alongside content: Merges additional content from the subtitle, such as annotations, reference text and comments. If not selected, only the selected subtitle's content will remain and the other subtitle's content will be deleted.
Subtitle: Merge subtitle with previous
Merge the selected subtitle with the previous subtitle on timeline.
(For the advanced merge options, see explanations above.)
Subtitle: Remove subtitle
Removes the selected subtitle.
Confirm: Shows a confirmation sign when you try to remove a subtitle, to avoid subtitles being deleted by mistake.
Subtitle: Split subtitle
Splits the selected subtitle.
Split subtitle: With this setting you decide how you want to split the subtitle. There are two options:
- Playhead: Uses the placement of the playhead on the subtitle, to decide where to split.
- Middle: Splits the selected subtitle in the middle.
Separation direction: Determine on which side of the playhead the separation should be.
Split text: Use the text cursor to decide where to split the text in the subtitle.
Split alongside content: Duplicates additional subtitle content such as annotations, reference text and comments to include it in both subtitles.
Focus: Determine which subtitle should be selected when the split is done.
Text: Send word to line
Instead of using the return key to rearrange words between lines, you can use this shortcut to send words up or down. To be able to use both commands, you need two shortcuts, one for up and one for down.
Text: Send word to subtitle
This shortcut allows you to send a word to the next or previous subtitle, depending on the shortcut settings. The next or previous subtitle is determined by its position on the timeline (not the subtitle index).
Adjust In- and Out-Time: In addition to sending words, you can also adjust the timing between subtitles. The in- and out-points of the affected subtitles will be adjusted based on the reading speed. This helps to maintain the synchronization of the text being moved.
Text: Set to color
Change the color of a selected word, line or manual selection. To open up the palette to choose a color, click the square.
Selection mode:
- Selection: Select the part of the subtitle that you want to change color
- Word: Use this option to change the color of the word that is closest to the text cursor.
- Line: Use this option to change color for the entire line. The text cursor is used to select line
Text: Toggle line horizontal alignment
Change the alignment of the subtitle. By repeatedly using the shortcut, you can cycle through all three horizontal alignments. Left, right and center.
Apply to all selected subtitles: This option enables the functionality to toggle between alignments for all selected subtitles.
Text: Toggle line italic
Adds italic for a whole line of text. Which line that should be affected is decide by the text cursor.
Text: Toggle text italic
This shortcut adds italics for the whole subtitle subtitle. If you enter new text after using this shortcut, all the text will be in italics as well. You will also notice that the subtitle will get a blue italic symbol, both in the text editor and for the timeline and list view.
Apply to all selected subtitles: This option enables the functionality to toggle italic for all selected subtitles.
Text: Toggle word italic
Adds italics to a word. You choose the word by using the text cursor.
Text: Toggle raised
Raise all the text in the subtitle subtitle to the top. This will also add an icon in the text editor, timeline and the list view.
Apply to all selected subtitles: This option enables the functionality to toggle to raised for all selected subtitles.
Time: Fix next subtitle's in-time
Change the separation between the selected subtitle's out-time and the next subtitle's in-time. The separation depends on the separation value in the properties panel.
Fix mode:
- Set absolute time: With this option enabled, the out-time for the next subtitle is fixed and the in-time and duration is changed.
- Move subtitle: With this option enabled, you move the whole next subtitle and the duration is fixed.
Time: Fix previous subtitle's out-time
With this shortcut you change the separation between the selected subtitle's in-time and the previous subtitle's out-time. The separation depends on the separation value in the properties panel.
Fix mode:
- Set absolute time: With this option enabled, the previous subtitle's in-time is fixed and the out-time and duration is changed.
- Move subtitle: With this option enabled, you move the whole previous subtitle and the duration is fixed.
Time: Set subtitle's in-time (absolute)
With this shortcut you change the in-time for the active subtitle. This shortcut can be used while the video content is running.
Reaction time(ms): enter your reaction time for editing subtitles with running content. The value unit is milliseconds. When you use the shortcut key, the change will be set to the number of milliseconds before you pressed the key. This to compensate for your reaction time.
Snap to scene: snap the in-time/out-time to the scene change. Scene changes are marked with red lines on the timeline.
Distance to scene: This is the snap area. If the shortcut is used inside this area, the snap will be applied. The value you enter here will affect the snap area both before and after the scene change. If there are several scenes inside this area, the closest scene will be applied.
Separation: if you enter a value here, the subtitle's in-time will be adjusted relative to the scene change. Both negative and positive values can be used.
Time: Set subtitle's out-time
Change the out-time for the active subtitle. This shortcut can be used while the video content is running.
For Reaction time(ms), Snap to scene, Distance to scene, Separation: see explanations above.
Time: Set subtitle's out-time and fix/create next
This shortcut affects two subtitles at once. You both edit the out-time for the selected subtitle and the in-time for the next subtitle. The gap that is created between the both subtitle depends on the separation value for the job. If there is no next subtitle, a new subtitle is created instead.
Fix mode: With this setting you decide how to treat the duration/out-time for the next subtitle.
- Set absolute time: With this option the out-time is fixed for the next subtitle.
- Move subtitle: With this option the duration is fixed for the next subtitle. This means the whole subtitle will be moved.
Reaction time(ms): enter your reaction time for editing subtitles with running content. The value unit is milliseconds. When you use the shortcut key, the change will be set to the number of milliseconds before you pressed the key. This to compensate for your reaction time.
Focus new subtitle: where should the text cursor end up for the new created subtitle.
Auto focus editor: in which edit field should the cursor be placed after you have added a new subtitle. You can choose between the text editor or the comments editor.
Time: Synchronize manually
Synchronize one or multiple subtitles by moving the subtitle(s) on the timeline. This with the help of the playhead. You place the playhead where you want the synchronization to start from.
Mode: where should the synchronization for the first subtitle start from.
- In-time: the selected subtitle will be moved to the playhead's position. The duration of the subtitle will be maintained.
- Out-time: With this setting the selected subtitle's out-time will be moved to the playhead's position. The in-time for the subtitle will be maintained.
Offset following subtitles: With this setting you apply the offset for the following subtitles on the timeline. All the following subtitles will be moved with maintained duration.
Auto focus next subtitle: When the synchronization is done, the next subtitle on the timeline will be selected.
Workspace: Edit mode
Switch to “Auto focus subtitle” and disable the text editor, so that you don’t edit text when the playhead selects a new subtitle.
Workspace: Find and replace
Opens up the "Find and replace" tool.
If you use this shortcut when you have selected text in the text editor, the text is pre-filled in the "Find" field.
Workspace: Go to
Open up the "Go to" tool, where you are able to either choose a subtitle to go to by index number or if you want to go to a certain time on the timeline. You can also jump through subtitles on timeline, as well as through scenes (shot changes).
Mode: There are four different modes determining how the tool looks and which button should be presented.
Focus: Choose which value box to be in focus, when the tool appears.
Workspace: Report tool
Opens up the Report tool. The "Check" button is in focus, so when the tool appears you just have to press the Enter key to start the check.
Plint Subtitler: spell check
To check the spelling, select Review / Spell Check in the top menu.
Select the correct language in the dropdown and click "Check". This process might take a while depending on the number of subtitles in the project.
Once the check is completed it will show a list of all the possibly faulty translations. You can either choose to "Ignore once" to skip one specific occurrence or "Ignore all" to skip all occurencies of a specific word.
Once you are finished simply close the Spell Check window.
When you have performed the spell check, and gone through the report, you can change the status of your translation to Done.

Plint Subtitler: error reporting
Common errors can be reported automatically in Plint Subtitler. They are defined by rules which are set centrally, for example by a project manager. A rule may be: "On this project type, the maximum number of characters per line is 38". The rules are loaded automatically for the job when you go to work so that Plint Subtitler can help you find potential issues.
Live error reporting (LER) is a feature that checks for certain problems and provides visual feedback/warnings in real time as you work. Other errors are only checked for when you actively run a report, for example as a final step before changing status.
When Plint Subtitler flags errors, there are two degrees of severity:
- Warning (yellow): less severe, can be ignored in certain cases
- Error (red): this is considered a blocking issues and should be fixed before changing status
For example: "Empty clip" might be allowed – if the translator elects not to translate a sign or line – which makes it a good candidate for Warning. Exceeding "Maximum lines", on the other hand, is very rarely permissible and will typically be considered an Error. However, severity degrees are ultimately determined by administrators and project managers.
Configuring which errors/problems to flag, and how to set the severity, is explained here.
Issues are reported in three different ways.
1. Live error reporting
The live subtitle information is shown just above the target language box and displays character count, reading speed and separation information live while you type. It helps you spot the most common errors right away. Below, the Reading speed is too high and the second line has too many characters.

Note that fixing an error may create a new one. In this case the "Count" error is replaced by "two many lines".

2. Report Tool
Select Review/Report tool to run the "Report Tool" and summarise all errors and warnings in a single view. This tool will look for all types of errors, including where a translation may differ from the template/reference text. The result will be presented in a concise manner, grouped by error type.
The categorised information allows you to quickly go through each category. The number after the error name indicates how many errors of this type the file contains. By clicking a specific subtitle in this window, the subtitle will also be selected. You can then make any necessary changes, and also see more information on the "Error" tab (see below).

3. The Errors tab
Errors for the currently selected subtitle are also shown on the "Error" tab in the top left corner of the editor. This includes both those found by live reporting and those found when running the Report tool. After selecting this tab you can cycle through all subtitles with errors using the arrow buttons. The area below shows an explanation of the error(s).

Please note that fixing an error may not automatically remove the warning, until you run the Report tool again or reopen the job. The error report is a temporary log which is created when you use the tool. If you leave the job and open it later, you need to run the report again to show all errors.
Error types explained
"(LER)" = flagged by live error reporting.
Empty clip
Indicates that the text box is empty.
Reading speed (LER)
This rule indicates how quickly a subtitle is presented for the viewer. It can have both a max (too fast) and a mini (too slow) value. Gives instant feedback on the Error tab, as well as by changing the font color for the ”Reading speed” value box above the text field.
The mathematical formula for this rule: Characters / (Frames/FPS) = CPS
Maximum characters per line / Count (LER)
indicates if you have too many characters on a line. Provides instant feedback on the Error tab, as well as by changing the font color for the concerned line(s) in the ”Count” value box above the text field.
The value set for this rule also affects the behavior for Auto line-break.
Index discontinuity
This rule indicates if there is a discontinuation for the clips index. It also gives a warning/error if the index start value is wrong. You can solve this issue:
- inside the Report tool by an option
- or by renumbering all clips on the timeline (right click)
- or in the drop-down menu (Clip>>Renumber all clips).
Extra spaces
This rule checks if there are unnecessary spaces. It looks for three different types of extra spaces: Leading, trailing and double. All of them can be solved inside the list of the Report tool.
Match value
This rule compares Reference text with the translated text, looking for a correct numeric value in the subtitle clip’s text for the current time span. If there is a mismatch or missing value against the reference subtitle clip in the current time span, there will be an error/warning. It looks mainly for numbers (0-9) but it can also be configured to look at other values, such as ½, ², ³.
Empty lines
This rule looks for empty lines. In the Report tool you will get an option to remove these.
Clip duration (LER)
This rule checks for clips with too high or too low running times. Clips below the minimum value or above the maximum value will be flagged.
Raised text
The Reference text is raised, but not the translation.
Italic
The Reference text is completely or partly italicized text, but not the translation.
Allowed hyphens
Only certain characters, such as n-dash or hyphen, may be allowed as dialogue dashes. This rule helps you spot where other characters are used.
Dual speakers
This rule helps you check if the correct rules for dialogue dashes are used in scenes with dual speakers.
Maximum lines per clip (LER)
Does the text exceed the max number of lines? (Typically, no more than two.)
Clip separation
How many frames should be left between adjacent clips? This rule will not only flag errors but also affects editor behaviour when using certain functions and shortcuts, such as fix clip time-in and time-out.
Allowed punctuation
Which punctuation marks are allowed? Can be specifically set for before, inside and after words.
Repeated word
Helps you spot when a word has been typed twice. Can be set to ignore repeated words separated by punctuation marks.
Paired punctuation
Ensures that both characters in a paired punctuation combo are present within the subtitle (for example, start and end parenthesis). This rule can also be set to allow paired punctuation to span multiple subtitles.
Forbidden characters
With this rule you can forbid certain characters in the subtitles. In the settings for this rule, one ore more forbidden characters are specified. When such a character is used in a matching job, the user gets a warning/error in the Report tool.
Mixed case inside word
This rule gives the user a warning/error if a word has a mix of lower and uppercase characters inside a word. In the settings for this rule, you are only able to enable or disable the rule.
Capital letter
This rule will give the user a warning if capital letters are not respected after the use of punctuation. In the settings for this rule, you can specify one or more punctuation marks. If a capital letters isn't used after such a punctuation mark, you get a warning. It is also possible to add exceptions, for example when the punctuation mark is adjacent to a number.
Punctuation spacing
This rule will give both a warning/error message and a highlight in the clip if punctuation isn't treated in the allowed way.
Plint Subtitler: MQM mode
When reviewing subtitles in Plint Subtitler, you may have access to an additional toolset called the "MQM mode". In this mode, Plint Subtitler will have a somewhat different layout and slightly different editing rules apply.
The purpose of MQM mode is to ensure that all changes are accompanied by an explanation and report, which is handled in the form of "Issues". Issues let you categorize the error you found (and corrected) and also determine the severity of the error. The error types are standardised, allowing for measuring the result across different platforms.

How to revise in MQM mode
- When you spot an error, click the button "Create first issue for this subtitle". Use the + sign above the issues list to create more than one issue.
- Make an edit for text and/or time if needed.
- Select a category for the issue.
- E.g. Accuracy / Mishear
- E.g. Accuracy / Mishear
- Select a Severity.
- Please refer to information from your project manager or quality expert if unsure about which severity level is relevant in a specific case.
- Optionally, add a comment under "Error description" to explain the change.
Note: All issues need a category and severity before you are able to change status for the job.
Features and buttons
- You can filter subtitles by severity in the List tab.

- You can jump between subtitles on the List tab inside the MQM tool.


FAQ
- What if there are multiple errors in the same subtitle?
- Just click the + sign and add one more Issue.
- How can I adjust the layout to, for example, enlarge the monitor?
- Just as in normal subtitling mode, you can zoom in and out using browser shortcuts and resize certain windows.
- The current layout will be stored and reused for your next MQM job.
- Tip: Maximising the browser window can make a big difference on laptops.
- How can I easily spot flagged subtitles?
- In the subtitle list, subtitles with attached issues will be shown with an icon at the right-hand side.
- The icon represents the selected Severity.
- Filter subtitles by severity in the List tab.
- I can't change status for the job.
- You need to assign a severity to all issues before you can change status for the job.
Plint Subtitler: Troubleshooting / FAQ
Video does not play / monitor is black
- Update to the latest version of your browser
- Try turning off extensions in your browser
- Ad blockers are for example known to cause problems
- If this doesn't work, contact a project manager
How are files automatically created?
And how can I start over if something goes wrong? Short answer, you may need admin access to start over. For a longer answer, read more here.
How do I offset a range of clips?
You can offset a clip and all following clips with the shortcut "Time: Synchronize manually". Another way is to do this from the timeline as explained below:
-
Select a range of clips
- for example by SHIFT-clicking the first and last clip the timeline
- or by right-clicking and using the "Select" options
- (selected clips will be highlighted in green)
-
-
Cut the selected clips
- right-click on the timeline and use a "Cut" option under "Clipboard"
- Select the new in-time for the first clip in the range by placing the marker on the timeline
-
Paste the cut clips
- right-click on the timeline and select "Clipboard / paste clips from"
Cutting range

Pasting

Guide: Time coding in Plint Subtitler
Start with configuring your shortcuts - please see this section
Basic structure when time coding:
- Play the media file and listen to the audio.
- When you hear someone speaking, or when a subtitle block should be added; pause.
- Jump back a couple of frames so that the subtitle starts at the right moment when the speak starts. Make sure to:
- B. Use the shortcut "Navigation: Jump frames" to set your reaction time, so that when you pause the film, and then jump back the number of frames your reaction time is set to, you will get a more accurate in-time of your subtitle block.
- B. Keep track of scene changes. Avoid subtitles crossing a shot change. In-cue on the shot change, out-cue two frames before (even if not followed by a new subtitle).
- When you are happy with the in time on your subtitle block, play the film again and pause it when you think the subtitle block should end.
- Translate the subtitle block.
- Rewind and check that the subtitle times to audio and that it does not violate any rules regarding shot changes.
Plint Subtitler: DubQC (Additional Audio Track)
When you start a DubQC job with an additional audio track, the dubbed audio track plays by default when the video begins.
Under the video monitor, you’ll find a green megaphone button. This button allows you to toggle between the dubbed audio and the original audio track.
If you hover over the button, you’ll see which track you can switch to. When the megaphone icon is highlighted in green, the dubbed audio is active. When the icon is black without a highlight, the original audio is active.
